DIY Pool Closing Guide
How To Guides - Pools
The season of splashing around in your pool is coming to an end. Before the Canadian winter arrives, it is vital that your pool undergoes a proper Pool Closing. If you wish to close your pool yourself, our experts have put together a Pool Winterizing Guide to help you on your way.
What is Winterizing?
Winterizing is the process of closing your swimming pool before the cold weather rolls in. Properly closing your pool will prevent damage to your pool, pool equipment and liner. Winterizing is important because most pool owners can’t perform regular swimming pool maintenance during winter. This means that without a running filter chemicals and bacteria can easily build up. Properly closing your pool will avoid this problem and will result in a smoother pool opening when the warmer weather returns.
Our guide below outlines our professional step by step pool winterizing instructions. If by chance you’d rather leave this task to our professionals, click here
Cleaning
The process of winterizing should be started a week before you officially close your pool. The first step is to clean your sand filter one week before using a high-quality filter cleaner. Clean the D.E or cartridge filter after closing your pool; following the manufacturers instructions. If you have a sump well please make sure it is drained before closing. We also recommend that you periodically check your sub well over the course of the winter to ensure that no water is building up in the sump well.
Remove
Remove your ladder, safety line and drop in steps (if applicable) while your pool water is still warm; since you will have to get into your pool to remove the sand bags used to weigh it down. Diving boards and slides can be left on the pool over winter, but we recommend that you clean them and wrap them in builders plastic.
Please note that when you remove inground pool ladders, you'll need to ensure that the liner protection bumpers on the ends of the rails, that rest against the liner, do not fall off or you will damage your liner.
Cleaning Part 2
Vacuum your entire pool. Ensure that all debris is removed and all dirt (including scum-line) is scrubbed and brushed. then clean your skimmer and your pump hair and lint basket.
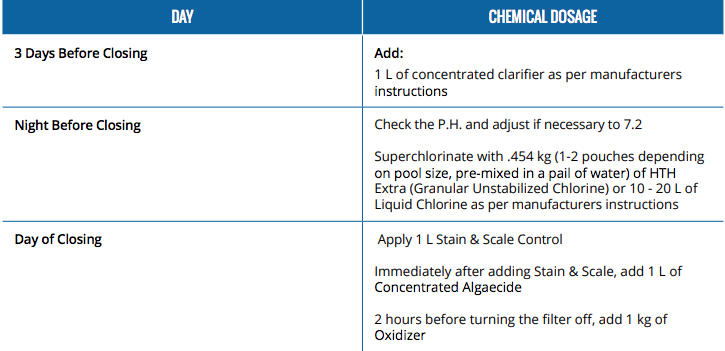
Chemicals
Chemical treatment instructions are based on pools that are approximately 100,000 L; for large or small pools please adjust accordingly. Treatments should begin the week before closing, and with your filtration system running.
Draining Your Pool
If you own an inground pool, set the suction line control valve to draw your pool water only from the designated vacuum line, or if your pool has one from the main drain. While draining your pool water, set the dial valve to backwash for 5 minutes, then set it to the drain or waste position. For lock in covers, drain to 15” below the coping. For water bags, safety covers, and above ground covers drain your water to 18” below the coping or top rails. If you do not have a suction control valve, use your vacuum or a submersible pump to lower the water.
For those of you who live in municipalities with pool water discharge restrictions, you’ll need to discharge water through your home waste water system (pumped through a hose down into you laundry tub drain for example), or slowly out to an area of your street that is permitted.
Freeze Proofing
One of the last steps of winterizing is freeze proofing all of your pool equipment including your: pump, filter, heater, chlorine or salt system, skimmer and heater. These items all need to be drained of any water. Plugs, pressure gauges, pumps, skimmer baskets and return fitting eyeballs should also be removed and stored in one place so that you don’t lose them.
Freeze Proofing Check List:
Plumbing Lines
All plumbing lines need to be blown out with an air blower to ensure that all water is removed (both skimmer and return lines). The skimmer, return and suction lines need to be plugged and/or sealed using winter plug kits and gizzmos for the skimmer.
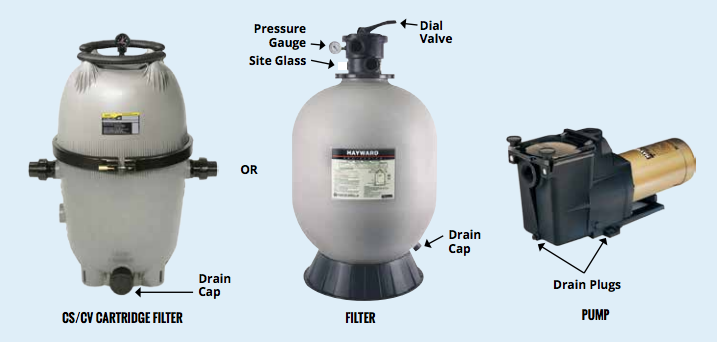
Filter & Pump
Next, you’ll need to set and leave the pointer on the filter dial valve to the winterize position; if your valve does not have this feature set the pointer between any two positions. For cartridge filters, open the air release valve on the top of the filter followed by removing and storing the drain cap at the base of the filter tank, the pressure gauge and site glass (if applicable). Next, you’ll remove and store the drain plugs from the wet end of the pump. Please ensure that all of the water is drained from both the filter and the pump.
Lights
Inground and onground lights should be weighted, placed in a bag and lowered into the pool. Above ground lights should be removed for storage and the resulting opening in the pool wall should be closed with a rubber expansion plug.
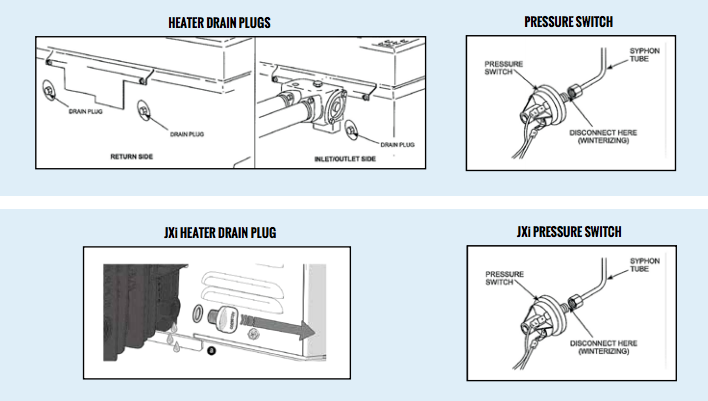
Heater
First, you will turn off the main gas supply valve to the heater that is found outside the heater jacket. Next, you’ll shut down your heater with the shutdown instructions found on the inside of it. Remove the drain plugs from the return side header, loosen the drain plug from the inlet/outlet side header, and completely drain the heater. You’ll need to use compressed air to blow out any outstanding water remaining in the heat exchanger. Grease the threads on your drain plugs and reinstall your plugs but remember to not tighten them. In addition, please disconnect the pressure switch from the siphon tube (copper tubing).
Remember! Your heater must be completely drained prior to the first frost. Serious damage may occur if any water freezes inside your heater and piping.
Please Note: It is vital that you follow your the instructions pertaining to your particular heater. There are some heaters that do not require you to disconnect the pressure switch.
Skimmers
Inground & Onground
First, you’ll need to remove and store your basket and floating weir. Insert about 3 feet of foam rope down the hole into the bottom of your skimmer, doubling the top end onto itself for easy removal in the spring; you can also add pool antifreeze as per the manufacturer’s instructions as well. You will then thread a gizzmo into this same opening. If your pool has two unplugged openings, in the bottom of your skimmer you’ll need to install foam rope and a gizzmo into the rear hole, and foam rope and a winterizing plug in the forward hole.
Above Ground
If you own an above ground pool, you’ll need to remove and store the basket and floating weir. Next, please disconnect your hoses from the skimmer and from the return wall fitting. Leave the hole at the bottom of your skimmer open and disconnect the pipe from the front of the pump to prevent ice damage.
Salt Water Generators
Zodiac LM Series
You will need to start by turning off the power to your salt system. Next, you will remove the cell by unthreading the quick-disconnect unions and removing the three lead wires from cell. Inspect the cell and clean it if necessary; please refer to your owner’s manual for cleaning instructions. Coil the wires and wrap them in a plastic bag to prevent corrosion over the winter; for convenience tape the bag to the power back. Insert expandable plugs into the upright plumbing lines where the cell was connected and store the cell indoors; the power pack can remain outdoors for the winter.
Zodiac Duo Clear Series
First you’ll want to turn off the power and disconnect the electrode plug. Coil the electrode cord and wrap it in a plastic bag; tape the bag to the power back for convenience. If your vessel is installed with unions you’ll need to unscrew the unions, remove and store the vessel, seal your exposed pipes with the expandable plugs and discard the used Nature2 cartridge. If your vessel is glued to the pipe, you’ll need to leave the vessel on the line for the winter. In addition, you’ll have to leave the cartridge and electrode inside the vessel for the winter.
Fusion Soft Series
Remove the Nature2 cartridge, place the temporary cap in place and tighten down the collar first. Next, carefully remove any remaining chlorine tablets; be sure to wear protective skin and eye wear. Replace your empty chlorine holder into the unit, retighten the collar and run the pump for 30 minutes to remove any remaining chlorine tablets. Remove and store the drain plug, rinse out your Nature2 Fusion thoroughly with water and blow your lines clear with air. Please ensure that your chlorine regulator dial is set to 5 while doing this. After you complete your Fusion Soft Series winterization, loosen the collars.
Automatic Chlorinator/Brominator Dispensers
In Line Permanently Installed
You will need to remove your cover and drain the plug in order to make sure that all of the water from your chlorinator is gone. Carefully remove undissolved tablets, rinse out your chlorinator thoroughly and replace the cover with your drain plug.
Off-Line
To start, remove your cover while carefully removing any undissolved tablets. Disconnect your unit at the inlet and outlet followed by turning it upside down for several minutes in order to remove any excess water. Once all of the water is out, you may re-install your unit. Please remember that this remaining water is concentrated chlorine; use extra caution here.
Install Your Cover
Finally, you have made it to the last step of your pool closing. If you have a safety cover, unfold it and spread it out over the pool from the shallow end back out over the deep end. While doing so, ensure that the springs and straps are properly affixed to the anchors around your pool deck.
For all of the lock-in vinyl winter cover owners, you will first place step cover over the step area (if present) and unfold the winter cover length-wise across one side of the pool. Pull the cover over while swiftly locking it into the winter coping channel around your pool’s perimeter.
Fabrene cover owners will need to unfold their water bags, fill them with water and place them around the pool’s perimeter. Your cover will need to be folded length-wide across the one side of your pool and then pulled across the entire pool while securing them in place with the water bags.
Winter Reminders
- Check the water level in your pool regularly over the winter.
- If you are losing water, keep the pool topped up until the leak can be found and repaired in the Spring.
- Sump wells need to be checked regularly.
- Drain excess water off the cover as it builds up.
- Remove leaves and debris from the cover during the fall using a pool leaf rake.
If DIY just isn't for you, click the button below to book a professional pool closing with us!